It's my turn to play with Barb's great fabrics, and what fun it has been. For those of you who may know this as a travel blog, bear with me!
My block is called Wyoming Valley Star.

But let me tell you a little about Barb and me! We met in a quilting class while we were both living in Hawaii, and became friends almost immediately. Both our husbands were in the military, so we had that in common as well. One of my favorite memories of those years was our Friday night dance classes. It was just the four of us taking lessons from Miss Sylvia, and we had a lot of fun during those classes (and when we went for dessert afterwards!). Later on, when I needed help with writing a book, Barb was right there to become co-author of Traditional Quilts with Painless Borders. Now we enjoy each other's company every year at our annual retreat with several other quilting friends. This is a friendship that has spanned many years and many locations, but quilting remains the constant.
This quilt block appears in several of my books, most
recently in Savvy Sets for Scrappy Blocks, and I'll be giving away a copy of
that book to one lucky winner. It's also a good place to show off a method I
have of making 2 ½" half-square triangles from 2 ½" strips with no
waste.
For my blocks, I chose two color combinations; one is a dark and medium black with red (my school colors!), and the other is a dark and medium blue with red. Both will work well, but the placement of the colors/values is essential to making each of the parts of the block visible.

My first step in making one of the blocks is to
audition the fabrics in the order that I will be using them. There are three
parts – the large star made of chevrons, the small inner Sawtooth star, and the
star that is formed by the corner units.
I call that one a "sitter backer" star, because it is not
prominent, it just kind of sits back there. I arrange the fabrics so that the
sawtooth star fabric is between the large star and sitter backer star, then
have a good look at them, perhaps squinting at them, to make sure that there is
good contrast.

I'll be using the red and black combination in the order you see, but I changed my mind about the blue and red one -- I'm making the sawtooth star out of the red.
Once I'm sure that the contrast works, it's time to
cut. Here's what you'll need for one star:
From the large star fabric: 8 rectangles, 2 ½" x 4 ½"
1
square, 4 ½"x 4 ½"
From the Sawtooth Star fabric: 8 squares, 2 ½" x 2 ½"
From the sitter backer star fabric: 6 rectangles, 2 ½" x 3 ½"
From the background 6 rectangles, 2 ½" X 3
½"
12
squares, 2 ½" x 2 ½"
Construction
Place the 2 1/2" x 3 1/2" background rectangles right sides together with the sitter backer star rectangles. Draw lines as shown (45o lines from two opposite corners) using a square ruler or Sally's Gizmo.
Construction
Place the 2 1/2" x 3 1/2" background rectangles right sides together with the sitter backer star rectangles. Draw lines as shown (45o lines from two opposite corners) using a square ruler or Sally's Gizmo.

Using the Gizmo


Using a standard ruler with a
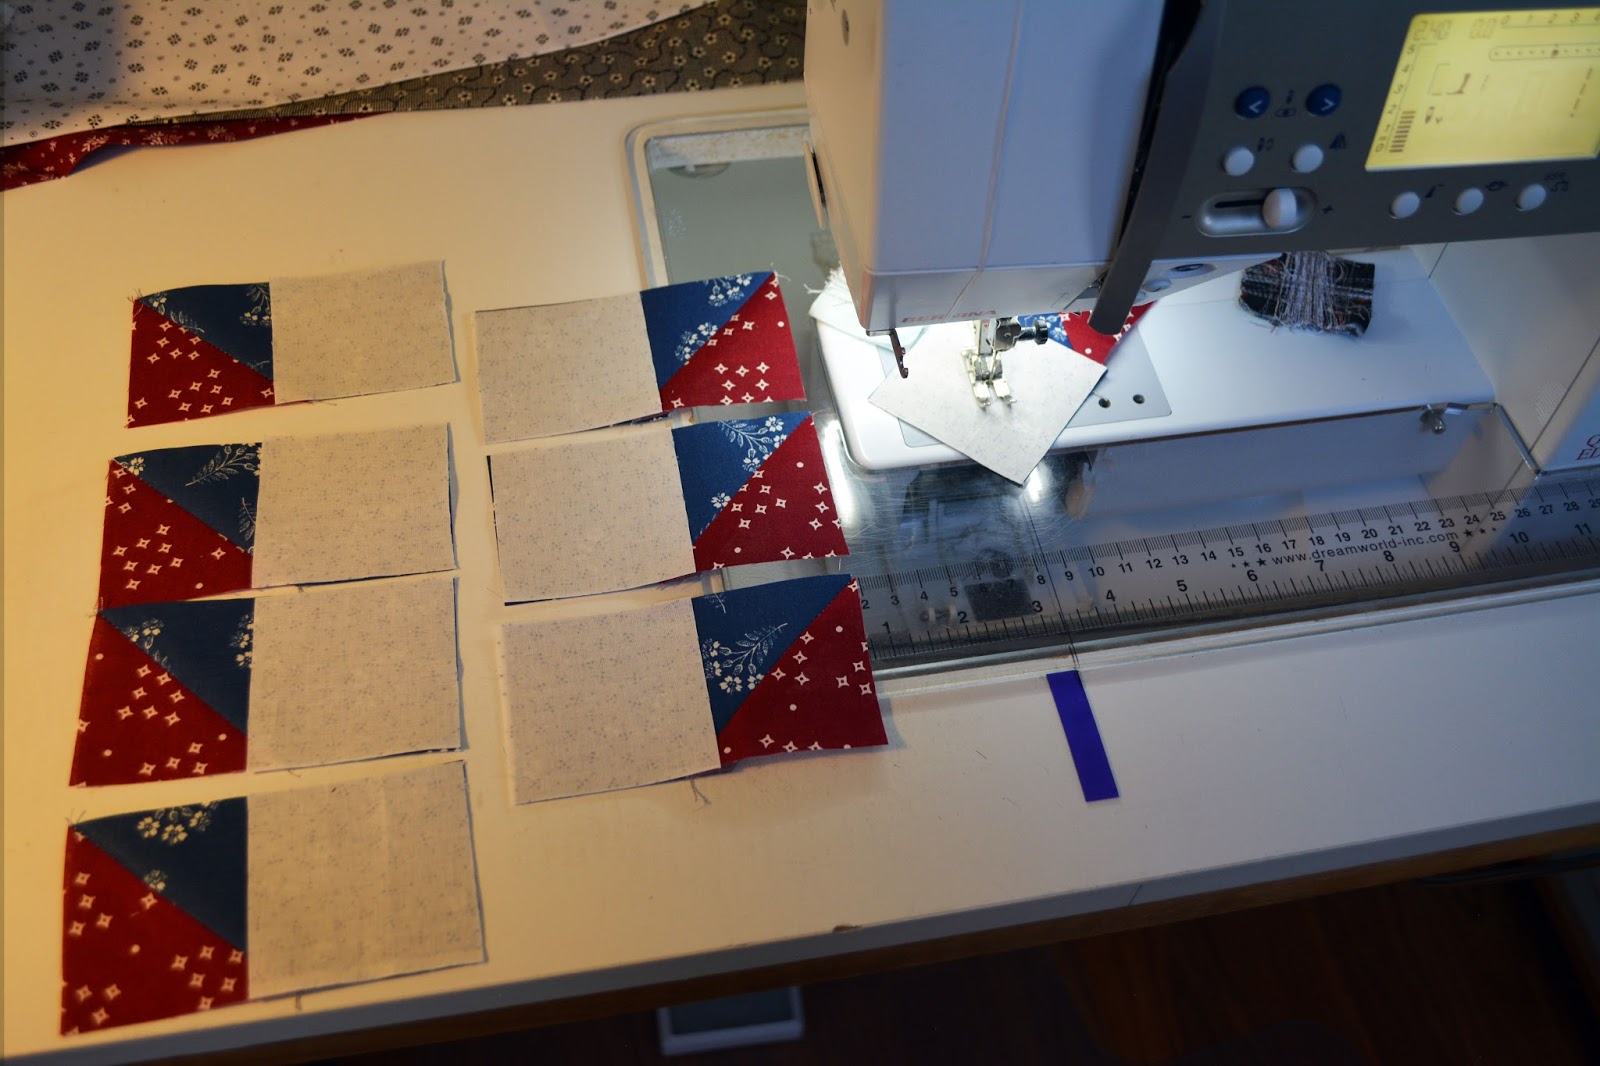
45o line.

Sew
on the drawn lines, and then cut apart between them. Press the seams toward the
darker fabric. Don't forget to trim away the little dog ears!
Arrange 3 half-square
triangles with a 2 ½" background square and sew them together as shown.


Press the seams in opposite directions, pressing the triangle unit toward the background square. Then sew the halves together.
For the large star points, I use the technique of sewing diagonally across a square, then folding the triangle back on itself. Many people draw a line to follow, but I have developed a technique whereby you do not need to draw that line; I draw the line on my sewing machine. Just line up a ruler with the sewing machine needle (in the down position), square it up with the machine, and use a Sharpie marker to draw the line from the needle toward you. Then, by guiding the bottom corner of the small square along the drawn line, you have perfectly sewn diagonal lines. Make sure the top corner of the small square is right at the needle.


Sew the Sawtooth Square pieces on one end of the Large Star rectangles. Sew 4 units in one direction, then make sure to sew the other 4 in the opposite direction. I don't start sewing at the corner because my machine likes to eat those little points -- by starting on the other side, I avoid that!


Sew these 4 in the opposite direction
You can chain piece these, but don't forget to use a scrap of fabric to lead on then lead off your stitching. This saves lots of thread and helps prevent those thread pileups that are so annoying!

Trim away the triangles 1/4" from the seam.


Add the background squares to the other end of each of the rectangles just like you did the Sawtooth Square pieces. Sew the seams in the same direction so that the rectangles end up as parallelograms. Press them so that the seams in one unit all go in the same direction (either toward or away from the background triangle).


There you have it, a beautiful Wyoming Valley Star block! I tried another one using the black and red fabrics; which combination is your favorite?


Don't forget to comment below and be sure that your e-mail address is included -- next week I'll pick one commenter to receive Savvy Sets for Scrappy Blocks and a Gizmo!
I like the blue star. Following Inspired by Fabric blog. 24Tangent@gmail.com
ReplyDeleteI like the blue star best. The other has too little value contrast for me. In fact, I'd like a bit more value contrast in the blue star also between the red and the dark blue, which read as nearly the same value to me. I follow Inspired by Fabric by e-mail.
ReplyDeleteHow neat!Like the blue star best! Thanks for sharing! Following Inspired By Fabric on Blog lovin'! msstitcher1214@gmail.com
ReplyDeleteThe blue star is my favorite. Thanks for the clever tip with the seam ripper. I follow the Inspired by Fabric blog, which is how I found your post.
ReplyDeleteI like both colorways but maybe the black slightly more. Thanks for the great tutorial and piecing tips!
ReplyDeleteI love the grey and burgundy colour way. Just gorgeous. Thanks for the chance to win your book.
ReplyDeleteJanet
I like the black, grey and burgundy colors, low contrast, but just enough. Thanks so much!! Love this fabric line.
ReplyDeleteThe blue star is my favorite, too. Of course the majority of my quilts are Quilts of Valor® so the bues and reds always catch my eye. I've enjoyed following this blog hop, but especially enjoyed your blog, Sally. I have about worn out your books that are in my library.
ReplyDeleteI like both blocks, I'm ready to make the block in both colorways! Great tutorial and tips!
ReplyDeleteI love the black and red star, but both are lovely. I am a follower of Inspired by Fabric. Thank you for the inspiration and the tutorial. janie(dot)mccombs(at)yahoo(dot)com
ReplyDeleteI have loved this blog hop and am sorry to see it end. I follow IBF on Bloglovin and perhaps there will be more of this in the future. My favorite is the red, white and blue block - such classic colors.
ReplyDeleteI follow IBF by email. It has been fun seeing all the blocks in their different variations. I think my favorite is the black combination.
ReplyDeleteI am just partial to the blue one, although the black is intriguing. Thanks for the tutorial, always interesting to learn new ways of doing things. I follow Inspired by Fabrics by email.
ReplyDeleteI have enjoyed seeing everyone's blocks, and again like the red, white and blue version. The Gizmo looks great - I hadn't seen that before. Thanks for the giveaway.
ReplyDeleteMy eye goes to the Red, Blue Cream star block & it is great for a quilt of Valor. I follow Inspired by Fabric by blog newsletter.
ReplyDeleteI'm following! I like the blue star best!
ReplyDeleteI'm liking the black star better just because the dotted white background fabric provides some pop to the block. Both are great and I'm intrigued with how you mark the squares when making the HSTs. I follow Inspired by Fabric via email posts.
ReplyDeleteWhat fun to have lived in Hawaii...and to have developed such a wonderful friendship. How lucky for you. I love both those stars, but my favorite it the red/white/blue...thanks for sharing the giveaway!
ReplyDeleteI love the blue star! Of course I love all things blue and this is a great block.
ReplyDeleteThe blue star is my favorite. I like the way you marked the lines.
ReplyDeleteI'm following Inspired by Fabric! I really like the way you made the chevron parts! Both stars are beautiful but i prefer the grey/red one! thanks for sharing! mumbird3atgmaildotcom
ReplyDeleteI love the blue star block. Thank you for the tutorial! I saw you at the International Quilt Festival in Houston in 2001 and have been a fan ever since! I hope to win your book! :) sfernkopf@yahoo.com
ReplyDeleteI also follow Inspired by Fabric with email. :)
DeleteI like the blue star the best. I follow Inspired by Fabric via email.
ReplyDeletececiliayoung at gmx.com
Both stars are fantastic, but the black and red one catches my eye. I like how the background fabric jumps out more. I follow Inspired by Fabric via email.
ReplyDeleteI follow Inspired by Fabric with email and GFC. I like the blue star best. Thanks for the tutorial.
ReplyDeleteSince I really do like blue, I will choose that as my favourite. Thank you for your wonderful tutorial and tips.
ReplyDeleteI follow Inspired by Fabric by email and really like the blue block - love the patriotic colors. Thanks for a great tutorial and wonderful block!
ReplyDeletelovely star. I love the red, white and blue best. thanks for the great tutorial.
ReplyDeleteI follow Inspired by fabric by email
quilting dash lady at comcast dot net
Funny how we identify with one block more than the other. The red and gray block speaks to me today.
ReplyDeleteI love your block! I'm a fan of the red and blue block. I have not seen the gizmo before. What a great technique. I follow inspired by fabric by e-mail.
ReplyDeleteI like the blue version better. It's a stunning star. I follow Inspired by Fabric via email.
ReplyDeleteBoth are fantastic.The blue star is my best favorite. I follow Inspired by Fabric by email.
ReplyDeleteLove your blue, red and gray color way block Sally. Thank you for the wonderful tutorial. I hope I win your book as I can bet there is a lot I would learn from it. I follow Inspired by Fabric by email, as they show such pretty fabrics and always have such creative quilters sharing their talents.
ReplyDeleteSuch a beautiful block and great tips! I think I am drawn to the blue and red block. I like the ghost background star and the dimension of the star block. I save threads with a scrap that is called a spider sometimes. I do follow the Inspired by Fabric blog and they have had some great blog hops!
ReplyDeletequilt 4 fun 2 at hot mail dot com
My favorite is the blue & red block. I'm a follower of Inspired by Fabric via Feedly. Thanks for great tutorial & the chance to win. jleekamitchell(at)yahoo(dot)com
ReplyDeleteI think the black and red is my favorite. I registered for the blog hop. yawnba@gmail.com
ReplyDeleteHi, thanks for sharing your block! I used to live in PA, Southern Chester County, not too far from tgecAmish country. Boy. Don't they make beautiful quilts! I am going to used your marking method on my machine so I don't have to draw on my fabric. I just got back from my quilting class today where we were making square in a square units and I just eyeballed the diagonal line. I don't want to mark on the fabric as it stretches the bias. I am signed up at Inspired by Fabric. My email is Jerushafields@gmail.com.
ReplyDeleteLove your blocks! The blue is my favorite. I'm a follower of Inspired by Fabric via BlogLovin.
ReplyDeleteThanks for a chance to win.
usairdoll(at)gmail(dot)com
Oh, I forgot to say that I like the red, cream and blue block best but they are both great.
ReplyDeleteThe blue and red is my favorite my email is loudog91301 at AOL.com
ReplyDeleteI like the blue block best. I'm an email follower
ReplyDeleteThere both very nice ty for sharing.....i got Inspired by Fabric via BlogLovin.....hmmmmi think the blue got my eye..... happyness04431@yahoo.com
ReplyDeleteOh my, both are stunning. I think the black and red is my fav (I keep switching as I look at them)--I think I'll use a lighter grey in the corners, similar to the blue block.
ReplyDeleteOops, forgot, I follow Inspired by Fabric via email.
ReplyDeleteI follow Inspired by Fabric via Bloglovin. I really like your blue version.
ReplyDeleteBeautiful blocks! I love the blue - I am always partial to that. thanks! I follow inspired by fabrics blog!
ReplyDeleteHard decision, but I am partial to the blue!
ReplyDeleteRed, white, and blue always steals my heart. That Gizmo is so cool! I am going to try this method of making hst's the next time I need some. I'm glad I follow the Inspired by Fabric blog via email so I could meet you today!
ReplyDeleteI like the black and gray star better. I follow inspired fabric by email. Thank you for the tutorial.
ReplyDeleteI like both, but I think the RWB look better(?). I follow Inspired by Fabric via email. Thanks for the giveaway.
ReplyDeleteI love this block, and you choice of fabrics for it. Great contrast.
ReplyDeleteLooove the Blue star best..I also follow Inspired by Fabric..thru Newsletter, Bloglovin & Pinterest too! :)
ReplyDeleteThank you for sharing & also for chance to win your Give-a-way! :D
I am a follower. I really like the blue, turned out great.
ReplyDeleteI love the red star
ReplyDeleteThank you for the seam ripper tip! Ingenious!
ReplyDeleteDmac5958ataoldotcom
,
I love the red one!
ReplyDeleteI follow by email.
ReplyDeleteI love the black and grey star!
The blue star is my favorite! I follow the Inspired by Fabric blog.
ReplyDeleteThanks for the tutorial. I like the blue star better, and I follow Inspired by email. lkedwards55 at yahoo.com
ReplyDeleteI like the black and red. Love that paisley fabric! I follow Inspired by Fabric via email.
ReplyDeletekakingsbury at verizon dot net
I love both blocks. The contrast and backgrounds are great. I think I would use this in a 3 color quilt, though. It's sure to add a fun design! Thanks for the inspiration.
ReplyDeleteI like the contrast in the star.
ReplyDeleteI like the black and red star better but both are wonderful.
ReplyDeleteAnother beautiful block! This is a great blog hop. Both color ways are great. If I had to pick a fav, I guess it would be blue. I follow inspired by fabric on FB and blog.
ReplyDeleteI think I like the blue and red block the best--surprisingly, I think it shows the contrast better, somehow. But, really, both blocks are quite nice and each would make a really stunning quilt. I follow the Inspired by Fabric blog by email, and am glad to have been introduced to your blog that way. wordygirl@earthlink.net
ReplyDeleteLove this block, I prefer blue version.
ReplyDeleteI like blue and red, thanks for showing us how you made your block, very helpful. I follow by email.
ReplyDeletedjcutting2(at)gmail(dot)com
I love the blue star. I follow Inspired Fabric by bloglovin. Thanks for the great pattern.
ReplyDeleteI really love the R/W/B version of your star. It's a fabulous block.
ReplyDeleteI like the blue and red star, thank you for the tutorial!
ReplyDelete~Brandy
brandizzle7133 at gmail dot com
Wyoming Valley Star in Black and Red. It's a beauty. Thank you for sharing both.
ReplyDeletebluestarof2(at)yahoo(dot)com
Hi....Love both the blocks...but I'd already decided on doing the blocks in this hop in black, claret and grey...so that would be my VERY favorite of the 2 combinations. I agree...the Gizmo is super cool....(hope I win, hope I win)....
ReplyDeleteI follow Inspired by Fabric via email....
ReplyDeleteThanks for a good tutorial for making the block and the tips you gave. I really like the block and can imagine it set together. I like both stars, but I guess I'm a traditionalist. The red/white/blue is more pleasing to me. dezertsuz at gmail
ReplyDeleteRed, white and blue -- the more patriotic, the better, as far as I am concerned! lynnstck(at)yahoo.com
ReplyDeleteLove the Blue the best!! But both were fantastic!! Where can we purchase Sally's Gizmo??
ReplyDeleteI like the red, black, and white one. I think that combination is so very interesting and I have it on my "to do" list. Just not sure which pattern yet but I will seriously consider this Wyoming Valley Star pattern. I follow Inspired by Fabric by email. kthurn(at)bektel(dot)com
ReplyDeleteI love the blue start best, but I love anything that leans toward patriotic. Great tutorial by the way.
ReplyDeleteI follow by a blog reader. I love this block, especially the blue! It looks complicated, but your directions look great.
ReplyDeleteLove your blue block-great for a Quilt of Valor! Excellent tutorial with great tips! I follow Inspired by Fabric by email.
ReplyDeleteYour Wyoming Stars are gorgeous. I like the blue one as that is my favourite colour.i would be overjoyed to win your book. Thank you for a chance to win . Happy Quilting :)
ReplyDeleteI follow by Bloglovin .
ReplyDeleteThe blue is my favorite, but I think this pattern would look great in any color. I follow by e-mail. Thank you for such a fun blog hop! ckrutjo@gmail.com
ReplyDeleteI like the blue one best and follow Inspired by Fabric by email.
ReplyDeletelkedwards55 at yahoo.com